
- Home
-
Categories
- Phần mềm quản lý sản xuất - Industry Software
- Thiết bị an toàn và phòng cháy chữa cháy
- Nhiệt kế hồng ngoại & thiết bị phát hiện khí
- Đo lực và Mô-men xoắn
-
Thiết bị kiểm tra chất lượng chai thủy tinh
- Kiểm tra thân chai thủy tinh
- Kiểm tra vai chai thủy tinh
- Kiểm tra bên trong chai thủy tinh
- Kiểm tra màu sắc chai thủy tinh
- Kiểm tra cổ chai thủy tinh
- Kiểm tra miệng chai thủy tinh
- Hệ thống lựa chọn chai thủy tinh tự động
- Hệ thống kiểm tra mẫu chai thủy tinh
- Đếm và kiểm tra chai thủy tinh nóng bị tắc
- Kiểm tra mức chất lỏng và vị trí nắp chai
- Kiểm tra chất lượng và nguồn gốc mã sản phẩm
- Hệ thống kiểm tra đáy chai thủy tinh
-
Hệ thống kiểm tra thép trong quá trình cán nóng
- Cảm biến kiểm tra thép
- Thiết bị chụp ảnh quá trình cán nóng thép
- Thiết bị kiểm soát chất lượng và quy trình trong nhà máy thép
- Hệ thống đếm sản phẩm trên dây chuyền cán thép
- Đo độ dài thép
- Hệ thống nhận diện đầu cuộn thép
- Đo kích thước thép nóng chạy liên tục
- Hệ thống kiểm tra bề mặt thép đã gia công
- Máy đo chiều dài thép tấm
- Thiết bị kiểm tra chất lượng mối hàn
- Thiết bị nguồn điện
- Đèn còi chống cháy nổ
- Thiết bị đo độ ẩm nhiệt độ
- Thiết bị xả tĩnh điện
- Mô-đun kỹ thuật số ASi
- Phần mềm quản lý hệ thống
- Phụ kiện
- Nguồn điện công nghiệp
- Thiết bị dò khí
-
Communication equipment
- Wireless broadcast receiver
- Industrial Switch
- Protocol Gateway
- Thiết bị giám sát cảm biến từ xa
- Bộ chuyển đổi giao thức
- Card mở rộng tín hiệu
- Thiết bị mở rộng IO
- VPN Router Công nghiệp - Thiết bị kết nối từ xa
- Thiết bị giao tiếp máy tính - I/O
- Bộ định tuyến - Router
- Bộ chuyển mạch - Switch
- Serial (RS232/485) Converter
- Serial to fiber
- Media Converter
- Remote I/O
- PCI Card
- USB-Serial Converter
- INTERCOM SYSTEM
- Industrial electrical equipment/Explosion Proof
- Industrial computers
- Compression and tension measuring device
- Industrial Inverter
- Humidity-Temperature-Dewpoint measuring device
- Flow / Air Velocity- Volume/ Pressure Equipment
- Cable Industry
- Measurement Industry
- PLC + HMI
- IP Camera - Video Server
- Products
- Partners
- Solutions
- Contact
- Blogs
Details
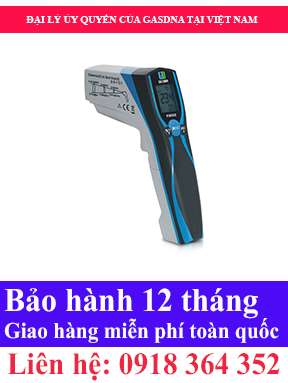
PIR1500 Operating Instructions
- The non-contact infrared thermometer is the ultimate tool for temperature measurements. It can measure from -35 to 1500 C (- 31~2732 ºF) in the distance of 75:1 DS (Distance to Spot) ratio. Furthermore, the memory mode can record and display the specific measurement with emissivity. There are many mathematical modes for the Infrared function.
- Please remember to keep away from children and don’t use it for safety related applications.
.png)
PIR1500 Operating Instructions
The non-contact infrared thermometer is the ultimate tool for temperature measurements. It can measure from -35 to 1500 C (- 31~2732 ºF) in the distance of 75:1 DS (Distance to Spot) ratio. Furthermore, the memory mode can record and display the specific measurement with emissivity. There are many mathematical modes for the Infrared function.
Please remember to keep away from children and don’t use it for safety related applications.
- Simply aim the thermometer at the measure target with Lens (11) and press Meas. key (8) to display the surface temperature.
- The Distance:Spot is 75:1. The two laser points are the reference for the target spot size. Please make sure the target area is within the field of view.
FUNCTION
Press Emissivity key (3) for setting the emissivity
.jpg)  |
Press Emissivity key (3), then press Up key (4) or Down key (2) to set the emissivity, then press Mode key (5) to confirm it. The emissivity can be changed from 0.10 (10E) to 1 (100E). |
|---|
Press Mode key (2) for scrolling more display function as follows
.jpg) 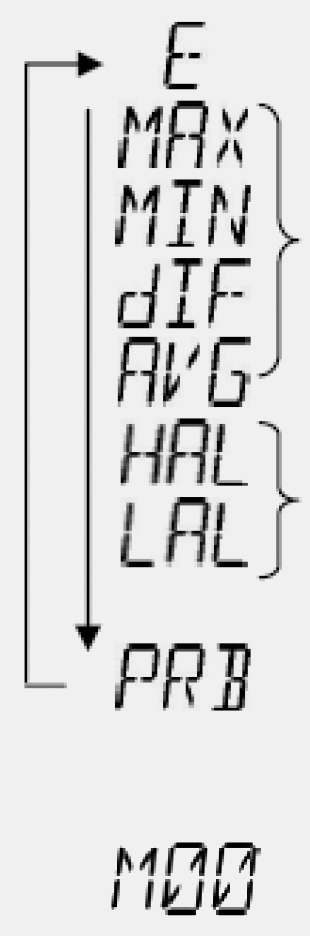 |
Here will show the emissivity data. (The default emissivity is 0.95.) |
|---|---|
| Press Mode key (5) for the Maximum (MAX), Minimum (MIN), Difference between MAX and MIN (DIF) and Average (AVG) modes. During the measurement, the special modes reading will be displayed beside the mode icon. | |
| Press Up key (4) or Down key (2) key to change the High Alarm (HAL) or Lo Alarm (LAL), then press Meas. key (8) to confirm it. When the reading is outside the High Alarm (HAL) or Lo Alarm (LAL) limit. The High or Low icon will flash and you will hear a beep sound. | |
Connect the thermocouple with Thermocouple socket (7) and put the probe in/on the target, the thermometer will display the temperature automatically without pressing any button. To see the minimum or maximum data during the probe measurement, please hold down the Up key (4) or Down key (2). After measure high temp, the probe may remain HOT for a while. After measure high temp, the probe may remain HOT for a while. |
The thermometer will automatically shut off if left idle for more than 60sec.
CAUTION
1. WHEN DEVICE IS IN USE, DO NOT LOOK DIRECTLY INTO THE LASER BEAM–PERMANENT EYE DAMAGE MAY RESULT.
2. USE EXTREME CAUTION WHEN OPERATING THE LASER.
3. NEVER POINT THE DEVICE TOWARDS ANYONE’S EYES.
4. KEEP OUT OF REACH OF ALL CHILDREN
STORAGE & CLEANING
It should be stored at room temperature. The sensor lens is the most delicate part of the thermometer. The lens should be kept clean at all times, care should be taken when cleaning the lens using only a soft cloth or cotton swab with water or medical alcohol, allowing the lens to fully dry before using the thermometer. Do not submerge any part of the thermometer.
LCD ERROR MESSAGES
The thermometer incorporates visual diagnostic messages as follows:
.jpg) |
‘Hi’ or ’Lo’ is displayed when the temperature being measured is outside of the settings of HAL and LAL. |
|---|---|
.jpg) |
‘Er2’ is displayed when the thermometer is exposed to rapid changes in the ambient temperature. |
.jpg) |
‘Er3’ is displayed when the ambient temperature exceeds 0C (32°F) or +50C (122°F). The thermometer should be allowed plenty of time (minimum 30 minutes) to stabilize to the working/room temperature. |
.jpg) |
Error 5~9, for all other error messages it is necessary to reset the thermometer. To reset it, turn the instrument off, remove the battery and wait for a minimum of one minute, reinsert the battery and turn on. If the error message remains, please contact the Service Department for further assistance. |
Details
| Item | Non-contact Infrared Scan function | Thermocouple Probe Scan function (K type; a bead wire included.) |
|---|---|---|
| Measurement Range | -35 ~ +1500℃ | K Type: -64 ~ +1400C Bead: -50 ~ +250C |
| Operating Range | 0 ~ 50℃ | |
| Accuracy | ±2% of reading or 2C ±2% | ±1% of reading or 1C |
| Emissivity Range | 0.1 ~ 1.0 (Default 0.95) | |
| Response Time | 1 sec | |
| D:S (Distance:Spot) | 75:1 | |
| Memory | Detailed 24 Memories with Temperature & Emissivity | |
| Battery Life | min 14 hours continuous use (Alkaline, without Laser and Back Light.) | |
| Dimensions | 204.14 x 179.19 x 58.40mm | |
| Weight | 355g including batteries (AAA*2pcs) | |
FREE
SHIPPING
100% MONEY
BACK GUARANTEE
ONLINE
SUPPORT 24/7

Featured
Check items to add to cart or select all
WP7-PM Momentary Push Button Manual Call Point
Liên Hệ: 0918 364 352
Related Products

Contact
Address
No. 66, 36 Street, Van Phuc Residential Area, Ward Hiep Binh Phuoc, Thu Duc City, HCMC, Vietnam.Phone
0918 364 352
Main Features
DienCN247 © 2019. All Rights Reserved
Working Days/Hours
Mon - Sat / 9:00AM - 17:00PM
Mon - Sat / 9:00AM - 17:00PM